Pages

Monday, November 19, 2012

Masala Chai Tea


Why not just call it chai?  Why masala chai?

By itself, the word chai is merely the generic word for tea in many African, Middle Eastern and Asian languages. For those of us that speak English, the term chai is synomous with what we would consider masala chai, a spiced milk tea distinct from other types of tea.

Up until about a year ago I had never experienced the deliciousness that is an authentic cup of masala chai. It wasn't something that I had very often, but I would occasionally order a chai latte at a coffee shop and think it was the best thing ever. Sugary, milky and spicy with enough caffeine to put a little pep in my step but not make me feel like I just did a line of cocaine.  Perfection.

Over the years I have gravitated towards a eating a more unrefined whole foods diet and have become obsessed  more inclined to make most of my meals and snacks from scratch.  I had googled the ingredients for the chai concentrate that I saw my barista using last time I got my latte on and was shocked to see sugar as the first ingredient on the list (actually I wasn't.. THAT'S why it tasted so freaking good), followed by honey, "spices", black tea and the ubiquitous "natural flavors".  Now I was on a mission. I HAD to figure out what spices were used so I could make it at home.  I could taste a hint of cinnamon and cardamom, maybe some ginger, but beyond that I couldn't identify what was in it.. probably because it's pretty damn hard to pinpoint what natural flavors taste like.

I searched the internet for a recipe only to learn that there is no fixed preparation when it comes to masala chai and most families have their own versions of the tea. Based on the fact that there are so many possible preparations, masala chai can be considered a class of tea rather that a specific kind. 

But alas, after a good amount of research... here's what I found.

When making masala chai, typically a strong black tea, such as Assam is used so that the spices and sweeteners don't become overpowering. Different teas are used in different regions; most chai in India is made with black tea whereas Kashmiri Chai is brewed with gunpowder tea.
Some people choose to take their chai unsweetened, but most people agree (myself included) that a good amount of sugar is needed to bring out the intricate flavor of the spices.  Plain white sugar, honey, jaggery, palm or coconut sugar can be used.
I once made the mistake of ordering chai without milk because I'm a bonafide milkaphobe (real word). Bad idea.  It tasted like tannic spices, although some people actually prefer it this way.  Usually whole or sweetened condensed milk is used, but I've made it with almond or soy milk with great results.

The traditional masala chai is brewed with different proportions of so called "warming spices". The spice mixture called karha, uses a base of ground ginger and cardamom pods. Other spices are added to this base depending on the region.  Most masala chai found on the streets, in homes or restaurants adds cinnamon, star anise and/or fennel seeds, peppercorns and cloves. Traditionally cardamom is the dominant spice, supplemented by other spices such as cloves, ginger and black pepper.  The traditional composition of spices varies by climate and region in Southern and Southwestern Asia.  For example, in Western India, fennel and black pepper are avoided.  The Kashmiri version used green tea rather than black and has a more subtle blend of flavorings; almonds, cardamom, cinnamon, cloves and sometimes saffron. Other possible spices may include nutmeg, coriander, cumin seed or licorice root.

Now that you know more than you probably wanted to know about chai... here's a recipe for ya'll.

Masala Chai Tea (makes 1 8 oz. serving, can easily be doubled)
From The Kitchn

3/4 cup water
2-4 whole green cardamom pods, smashed
1-2 thin slices fresh ginger
1 1-inch cinnamon stick
1 piece star anise
3/4 cup milk (I used almond)
1 1/2 teaspoons loose black tea leaves
Sweetener, to taste (I prefer honey)


In a small saucepan, combine the water, cardamom, ginger, cinnamon stick and star anise. Bring the mixture to a boil then lower the heat and simmer for a few minutes until the mixture is fragrant. Add the milk and tea leaves, and simmer for another minute then turn off the heat and let steep for 2 minutes. Pour into a cup through a fine mesh sieve. Discard the leaves and spices. Add sweetener, to taste.
If you want deeply flavorful tea in the morning, follow these alternate directions starting the night before.
In a small saucepan, combine the water, cardamom, cinnamon stick and star anise. Do not add the ginger yet. Bring to a boil then turn it off and cover the pan. In the morning, add the sliced ginger and bring to a boil then lower the heat and simmer for a few minutes until the mixture is fragrant. Add the milk and tea leaves, and simmer for another minute then turn off the heat and let steep for 2 minutes. Pour into a cup through a fine mesh sieve. Discard the tea and spices. Add sweetener, to taste.

Monday, November 12, 2012

Chickpea Noodle Soup


After being a vegetarian for fiftteen years, I started eating meat again.  Over the years I avoided meat for several reasons.  I orginally gave it up to lose weight.  As a teenager I thought I was fat (much like every crazy girl going through puberty) and believed that cutting out animal flesh would make me look like a model, only to discover that starving yourself and working out three hours a day does that. I kept this up for several years, eventually going vegan and became active in animal rights organizations like PETA. Yeah, I was THAT girl that got dragged away by police officers for barricading the enterance to Macy's chanting "fur is murder".  Ahhhh, those were the days.  I felt very strongly about animal rights and still continue to do so even though I started eating meat.  Yeah, I realize that I'm totally contradicting myself here.  How can you support animal rights and still have a clear conscience about eating meat?

First of all, I'm EXTREMELY picky when it comes to what I eat. Unless I know where it came from, (as in, I can drive to the farm where it was born, raised and salughtered) I won't eat it.  That narrows it down when it comes to eating out or dining elsewhere.  If I'm going to eat meat I want to be sure that the animal was able to roam free and was fed a healthy diet before it's life was taken. You would be be surprised how most animals are raised before their death.  It sickens me and I won't go into to detail, but it's not a pretty picture.

Luckily I have a local co-op that sells local meat, dairy, eggs and sustainable seafood, but it ain't cheap.  I'm willing to pay $6 for a dozen of eggs, but that lasts me at least a week, if not longer.  A whole chicken will run you $25 but will make several meals, including stock.  A pound of bacon might set me back $15, but again I can easily six meals out of this. If you are accustomed to shopping at a typical grocery store you probably think these prices are outrageous (I should note that I get a hefty discount when I shop for being a co-op member).  I agree, it's not cheap, but I also think that you get what you pay for and when it comes to most things in life, it's quality not quantity.  I don't eat meat everyday (I actually only eat it once a week, if that) and enjoy it as more of a side dish than a main. 

We live in a consumer culture where we want more bang for our buck and our food system reflects that.  People can get massive quantites of meat for very little money at most grocery stores.  The more they have, the more they eat, and the more unhealthy they become.  It been proven that countries that eat less meat have less health problems, and just look how healthy we Americans are!

So, here's the lesson: Meat is not unhealthy, nor will it make you fat., just don't go all cray-cray with it. Personally I feel a little healthier when I add a little high quality animal flesh to my diet.  Since local, sustainable meat IS expensive it doesn't always make it to the dinner table, and I'm ok with that.

I had been craving chicken noodle soup for months, but spending $25 on a chicken wasn't in the budget this week. Then, I did what any hippy vegetarian cook would do, and broke out a can of chickpeas.... BOOM.. Chickpea Noodle Soup!


Chickpea Noodle Soup (serves 2)

4 c. vegetable broth
3 T. mellow white miso
1/4 lb. angel hair pasta (spaghetti or linguine work well too)
2 medium carrots, peeled and cut on a 1/4" diagonal
3/4 c. chickpeas
1/4 t. poultry seasoning
1 large clove garlic, grated
2 c. kale, stems removed cut into thin ribbons
2 scallion, sliced
Fresh cracked pepper, to taste
Extra virgin olive oil

Cook the angel hair or other noodles of choice until al dente. Drain and set aside.
Place the vegetable broth in a saucepan and bring to a boil. Place the miso in a small bowl and ladel 1/2 c. broth into the bowl.  Whisk until thoroughly mixed.  Add the carrots, chickpeas and poultry seasoning to the remaining stock and reduce the heat to a simmer.  Cook until the carrots are fork tender, about five minutes.  Add the miso/stock mixture back to the pot (be sure not to boil the miso as it will kill the live beneficial bacteria) along with the grated garlic.  Add the kale and cook on low for an additional 2-3 minutes.  Divide the noodles between two bowls and pour the broth mixture over top.  Top with sliced scallions, lots of fresh cracked pepper and a drizzle of olive oil. 

Saturday, November 10, 2012

Hemp Seed Milk


As much as I love all things dairy (cheese, ice cream, gelato, and yogurt), the idea of straight up cows milk kind of skeeves me out (yeah, I know... add it to the list of my weird food phobias).  For some reason it just tastes too much like cow teet or something.  I don't know....

Most people that give up dairy products for health reasons turn to soy milk as an alternative, but there are so many other options out there. Rice milk, oat milk, almond milk, hemp seed milk and even flax seed milk.  Health food stores and food co-op usually have a section for these alternative milks, packaged in shelf stable cartons.  You can choose from sweetened, unsweetened, vanilla or chocolate, full fat, low-fat or fat-free.  Many of them are even fortified with calcium, vitamin D and other essential vitamins.  Having these options at our disposal is great for convenience sake, but when it comes down to it, these alternative milks are highly processed, not to mention expensive. 

Most people don't realize that you can make your own nut/seed or grain milk from home. Not only is it way cheaper, it's alot healthier than anything you would buy in the store.  Most store bought alternative milks contain natural and artificial flavors (whatever those may be) and can be high in sugar.  Many of them claim to be high in vitamin B12, omega 3 fatty acids or calcium, but most of these are added back in because many of those nutrients were destroyed during processing.  When you make milk at home you are left with two ingredients: water and whatever nut/seed/grain you used. All of the vitamins and minerals are left intact and you are left with a delicious, healthy beverage. 

Two of my absolute favorite milks to make at home are almond and hemp seed milk.  Almond milk is probably my favorite but that requires soaking your nuts for at least eight hours and sometimes I'm not that good at planning ahead.  Hemp seed milk can be made in minutes.  Throw some hemp seeds in a blender, add some water and blend.  You can even add some sweetneer like honey or agave or vanilla extract if you like. 

Not only do hemp seeds make a great milk substitute but they are loaded with all essential amino acids, iron, folic acid, potassium, calcium, zinc, and are also rich in easily digestible plant based proteins. They are the only food that contain gamma-linolenic acid (GLA), an essential fatty acid. In fact, its essential fatty acid ratio is absolutely perfect for our bodies.  Hemp has gotten a bad reputation due to the fact that some people think that it contains THC, the active chemical in marijuana that will get you high. Chill out.  There is none of that going on here.... just creamy deliciousness.


Hemp Seed Milk (makes 1 quart)

1/2 c. hemp seeds
4 c. water
raw honey or agave (opt)

Place hemp seeds and water in a blender. Blend on low for one minute then crank it up to high and blend for an additional 30 seconds. If you want it on the sweet side, add a bit of agave or raw honey and blend for another 10 seconds, or so. Pour into a glass jar or bottle and store in the fridge for 3-4 days. Shake well before using.


Thursday, November 8, 2012

Herbal Profile: Valerian


As much as I love cooking, photographing and recipe development, sometimes I just don't have the energy. Especially after working a full day in a kitchen, or in my current situation, being laid up in bed healing from a lingering concussion.  Sometimes I will develop a recipe only to find out the end result looks like cat vomit. Or... I will throw a bunch of random ingredients together and think the dish looks beautiful and blog worthy but the last thing I want to do is break out my camera when I'm already borderline passing out from low blood sugar. Real life.

My food as of lately has been pretty boring since I haven't been able to be in the kitchen for more than 15 minutes without feeling like I'm going to hit the floor. Cooking is my creative outlet and without it I feel a bit.. well, empty.  It sounds strange, but food is my passion, my life force, if you will.  I cook professionally and when I'm not at work I'm either blogging about food, eating food or looking for new recipes.  I'm at a point where I want to cook and be in the kitchen. My mind says yes (er, sort of), but my body is telling me to rest.

So, out of this temporary hiatus in the kitchen, a new idea was born.  Why not write about something else that I am passionate about: Herbal Medicine. You see.. I'm really not a fan of western medicine.  I think it can be extremely helpful in certain situations but I think that we have become a culture that relies on pills to fix all of our health problems. Whether it be high cholesterol, high blood pressure, diabetes, gastrointestinal ailments, anxiety, depression, etc. there is surely a pill out there to "cure" what ails you.  Don't get me wrong many people benefit greatly by taking these medications, hell, it may be keeping some of you alive!  However, most of these pills come with unwanted side effects, and in the long term, who knows what it's actually doing to our insides.  I currently rely on prescription medicine and have done so in the past, but I think that there are other alternatives out there that have been proven to be just as effective and are alot easier on your body.  Changing your diet to include whole, unprocessed foods is a no brainer but alot of people are resistent to make such a huge lifestyle change.  A healthy diet is the foundation for good health along with exercise and stress management techniques.  But, lets be real.. we all get sick, even if we are doing everything "right".  The first thing we usually reach for is a pill that will make us feel better.  Heartburn, pop a pill.  Cold coming on? Pop a pill.  Can't sleep? They have a pill for that, too. These pills may help in the short term, but they are really just covering up the symptoms not getting to the root of the problem.

That's where herbal medicine comes in.  Why not try something that comes from nature (sometimes you can even find it in your garden or back yard), actually helps treats the problem and not just cover it up, and in most cases doesn't cause any nasty side effects. You don't even need health insurance or a prescription from a doctor. Herbs have been used for thousands of years and have been proven effective in the case of many ailments.  When taken, some herbs work immediately whereas others have to be taken in frequent high doses or taken over an extended period of time to see any noticeable benefit. 

So, this here post is the first in the herbal profile series.  I hope to post about a new herb once a week.  In these posts you will learn the history of the herb, what it's used for, how to prepare it (tea, tincture or decoction) and what it tastes like. Some say that the more bitter or vile an herb tastes the better, which is not always the case, but I usually find it to ring true.

**** Disclaimer: I am a cook and not certified herbalist. Everything you read here is based on what I have read or personally experienced. Do your research before taking any herbs as they can interfere with certain prescription medications (i.e. St. Johns Wort can interfere with birth control pills-YIKES!). Some herbs can actually worsen a particular health condition (i.e. Licorice can raise your blood pressure)

I am able to find most of the dried herbs and/or tinctures at my local health food store.  If you are interested in buying online I highly reccomend checking out Mountain Rose Herbs or Herb Pharm.


Herbs to Know: Valerian Root (Valeriana officinalis)

Valerian's name is derived from the Latin word valere, "to be well", "be strong" and has been used as an herb since at least the time of ancient Greece and Rome. Today ther herb continues to be one of the most popular medicinal herbs in the world.  Valerian is best known for it's effects on the nervous system. It is one of the best known herbs for insomnia/restless sleep/stress and anxiety. Valerian has powerful tonic effects on the heart and when combined with hawthorne berries it helps to aleviate altitude sickness.  It is also known for it's anti-spasmodic properties, helping to relieve spastic coughing.  Because of it's muscle relaxant properties, it's an excellent remedy for menstrual tension and stress. When combined with cramp bark it effectively relieves menstrual cramps.

Valerian's odor is a little, how shall I say.... ripe.  I'm not gonna lie, it smells a little bit like dirty socks.  The odor is actually an indicator of the strength of the root: the riper, the better!  It can be prepared as a tea or taken as a liquid extract (aka tincture). I prefer liquid extracts in most cases because they are easily absorbed, digested and assimilated by the body. Sometimes taking 30 drops in some water is easier than drinking 1-2 cups of the tea, especially when the taste isn't very pleasant.

Valerian is dose-dependent; in other words, in order to be effective, a large amount may be required.  Don't be afraid to take adequate amounts. Begin with a slow dose and work your way up until you feel the relaxing effects.  The herb is non-habit forming and will not make you feel groggy.  You can tell when you've taken too much when your muscles feel rubbery, or you experience a heavy, weighed down feeling. 

I've taken valerian tincture as a sleep aid and have combined it with cramp bark, ginger and pennyroyal to help alleviate menstrual cramps.  Unlike some herbs that you must take for an extended period of time to experience the benefits, valerian starts working immediately.  Next time you reach for an over the counter pain reliever for cramps or a prescription sleep aid to help you get some rest, give valerian a try instead.

Tuesday, October 30, 2012

Kimchi Fried Rice (Kimchi Bokkuembap)


Last week I suffered a pretty bad blow to the head.  I didn't loose consciousness or anything, I just felt like someone dropped a brick on my noggen.  After a night in the ER I was told that I had a minor concussion and symptoms should dissapear within a week.  Being the obsessive compulsive, Type-A personality kinda gal, I returned to my job, shortening my hours. I mean, anything less that 40 hours is considered rest, right?  I would come home, lay down for a bit, run an errand if I was feeling up to it and then spend an hour in the kitchen cooking dinner. 

A week had gone by and I wasn't feeling any better. I was actually feeling worse.  Headaches, vertigo, and dizziness were preventing me from doing anything (working, going to the store, walking the dogs, etc..) To sum it up, I felt (and continue to feel) drunk and severly hungover at the same time, which is not exactly a fun time.

Rest.  Like, really resting is very difficult for me.  Laying out the couch doing absolutely nothing is pure torture.  So much, that even when I felt like absolute shit I would still continue to go about my day as if nothing was wrong, and would wonder why it always took so long for my body to heal itself.

I tried to work through my head injury and that got me nowhere fast.

My brain was sending my body a very important message (you know that I need to chill the hell out NOW, or I could do some serious damage), and for once, I finally listened. Sleeping 8-10 hours a day and confining myself to the couch, moving only to eat and pee has become the new protocol.  Anything stimulating (reading, listening to music, watching T.V., playing on the computer) is a big no-no when trying to heal from a concussion, but I'm still allowing myself a couple hours a day so I don't go cray- cray.

Baby steps.

So what, you ask, does kim chee fried rice have to do with having a concussion?

Absoultely nothing, other than the fact that all of my meals have to be prepared in less that ten minutes so I can get my butt back on the couch, and this here fried rice fits the bill perfectly.  It fills me up all day, is super healthy (er, other than the fried part), and is the ultimate comfort food when I'm feeling down.

As long as you have some leftover rice, kimchi, eggs and some vegetables on hand, you can throw this dish together in no time.

Up until recently I had never had kimchi.  I love fermented foods (saurkraut, kombucha, yogurt) for their taste and health promoting benefits but never gave this one a chance.  However, once that first bite crossed my lips, I became addicted and have gone through an entire jar in less than three days!

Kimchi is a traditional fermented Korean dish usually made with cabbage, radish, onions, garlic, chilis, and seasonings, but can vary from region to region.  It's salty, crunchy, sour, spicy and oh so good for you due to the fermentation process. Kimchi is consumed as you would any pickled vegetable, most commonly enjoyed with rice, noodles, meat or tofu and vegetables.  Whipping up a batch of kimchi fried rice (aka kimchi bokkuembap.. I just love saying that) is a great way to incorporate this delicious pickle into your diet when you want a quick meal.


Kimchi Fried Rice (Kimchi Bokkuembap) (serves 2)

3 c. leftover rice (I used white jasmine)
2 T. sunflower oil (or any neutral oil)
3 cloves garlic, grated
2" piece ginger, peeled and grated
two large handfuls baby bok choy, rough chopped
two large handfuls baby spinach
3/4 c. kimchee, rough chopped (I used Mama O's brand straight outta Brooklyn)
4 scallions, thinly sliced.
2 t. sesame oil
cayenne or crushed red pepper flakes, to taste
sea salt and black pepper, to taste

2 eggs
1 T. butter or sunflower oil

Heat 2 T. oil in your largest cast iron skillet (or any other large frying pan) over medium high heat. Add the baby bok choy and cook until wilted.  Add the garlic and ginger and cook an additional 30 seconds, stirring constantly to prevent burning.  Add the rice, tossing to coat with the oil. Spread rice into a single layer and let cook for a couple minutes.  Using a spatula, mix the rice up a bit then spread it out again.  Repeat until the rice starts to crisp up a bit, then stir in the baby spinach, half the scallions and kimchi.  Cook for an additional 30 seconds, stirring constantly to wilt the spinach. Add sesame oil and season with cayenne or crushed red pepper flakes (depending on how spicy your kimchi is), sea salt and black pepper. Divide the fried rice between two bowls. Reduce the heat to low, scrape out any remaining bits left in the skillet and return to the burner.  Add butter or oil, then crack two eggs into the pan. Cook until the whites are set but leave the yolks runny. Carefully slide the eggs onto the fried rice.  Top with the remaining scallions and eat immediately. 


Monday, October 29, 2012

Sprouting: A Do It Yourself Guide


Sprouts have long been considered wonder foods, being one of the freshest and most nutritious of all vegetables. Sprouts are very alkalizing, and are high in in vitamins A, B and C and rich in minerals such as iron, calcium, and potassium. They are also high in fiber and omega 3 fatty acids.

Most of you are probably familiar with alfalfa or clover sprouts (the kind you're most likely to see on salads or sandwiches) or mung bean sprouts (those crunchy white sprouts integral to Asian cuisine), but you can sprout almost any seed or bean.  Even wheat and spelt can be sprouted and used to make bread. 

Most people think that growing your own sprouts is a difficult task, but it couldn't be easier!  All you need is some seeds, a glass jar with a mesh screen, some water and about two minutes a day to rinse and drain your sprouts. A clamshell of sprouts will usually set you back $2-3, which considering how nutrient dense they are, isn't a bad price. However, purchasing your own seeds for sprouting is inexpensive and growing them from seed will ensure that you have the freshest sprouts possible!

Make sure you purchase high quality beans/seeds for sprouting.  Health food stores or on-line shops sell an abundance of seeds and beans, however, you may have difficulty sprouting regular 'ol beans and seeds from the grocery store because they are sometimes treated with enzyme inhibitors to prevent the sprouting process.  Avoid using seeds packaged for gardens because they may be treated with pesticides. 

I invested in a sprouting jar fitted with a perforated lid which makes the rinsing/draining process easy peasy, but you could also use a mason jar and purchase a mesh screen (either plastic or metal).

Fortunately, I was able to find all of the above supplies at my local co-op, but the sprout people, an online company, has everything you need to get started.

Before you begin:
Make sure your sprouting jar is clean and sanitized to prevent the growth of bacteria or molds.
A little goes a long way with those seeds!  Most expand 8 times their original volume, so using as little as 1 -2 tablespoons of seeds will yield several cups of sprouts.

Happy sprouting!


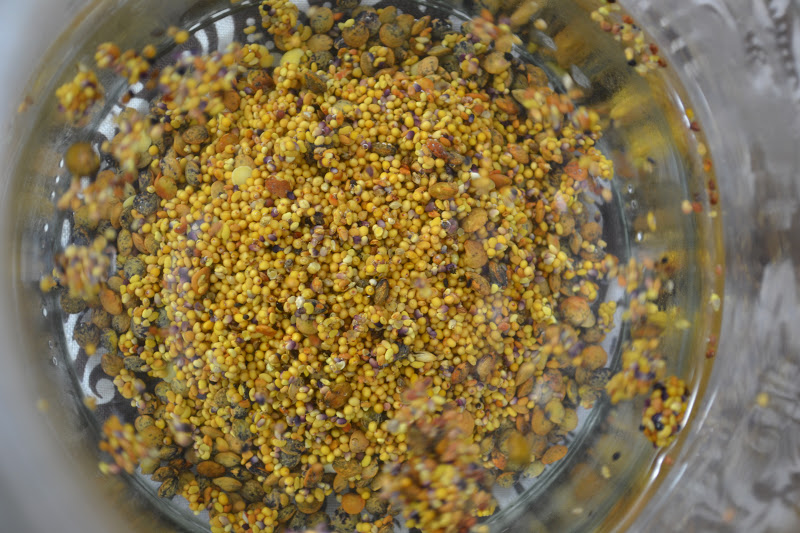
Sprouting seeds (lentil , clover, radish and alfalfa).

Soak 3-4 T. of seeds in a sprouting jar or a mason jar fitted with a mesh screen in enough cold filtered water to cover by 5 inches.  Let sit on the countertop for 24 hours.


After your sprouts have been soaking for a day, drain thoroughly.  Fill the jar half way with cold filtered water and swish your seeds around a bit.  Drain again and place the jar in a bowl positioned at a 45 degree angle.  Repeat the rinsing/ draining process two to three times a day (I usually do it twice: in the morning and before I go to bed) returning the jar to it's tilted position each time. The amount of time it will take for your seeds to fully sprout will vary from seed to seed and factors such as temperature an humidity.  This blend takes 5-6 days total (counting soak time)

24 hours after our initial draining.


                                   48 hours later.


                                     72 hours later.


And... we got sprouts!  On the final day I like to place my jar on a windowsill, exposing it to sunlight for a couple hours.  This allows the sprouts to develop chlorophyll, turning them from yellow to light green.

Once your sprouts are done, transfer them to a tight fitting container lined with paper towels to absorb any excess moisture.

Friday, October 26, 2012

Raw Tacos


You're probably thinking.. enough with the raw food already. 

Where are all of the recipes featuring brussels sprouts and acorn squash and cranberries.  Where are the warming comfort foods?

Patience, little grasshoppers.  We've got five good, solid months of cold weather ahead of us, so I'm in no rush to be eating squash (and blogging about it) every other day of the week.  Check back in a month or so when I'll be bitching about the cold and living off of hot toddy's.

There are some recipes featured on my blog that in no way resemble the "real thing".  I'm not trying to fool anyone by convincing you that this here raw taco will taste just like something that you would pick up at your nearest Mexican restaurant.  There is no fried corn tortilla, no ground beef and no sour cream.  The only thing that you might find in both of these versions is some fresh salsa and guacamole.

But, then again.. why should we have to compare something that is delicious and thoughtfully prepared to something else when we can just enjoy it for what it's worth.  Just like my raw carrot and parsnip fettucine or these raw brownies.  I'm not trying to pass them off for pasta made with wheat or brownies made with eggs, butter, sugar and flour, but they are still tasty nonetheless, and much healthier too!

Cabbage leaves are a great vehicle for anything that you would normally put into a taco shell or corn tortilla except they contain no fat or wheat but still give you some crunch.  Ground walnuts with some traditional taco meat spices (chipotle, cumin, chili powder and garlic) mimic the flavor and substance that you would get with ground beef.  Soaked raw cashews blended with a little lemon and salt makes a creamy alternative to sour cream and is great for those that have an intolerance to dairy.  Adding a dollop of guacamole and a little fresh salsa made with cherry tomatoes and bell peppers is a given because they are delicious and belong in a taco.

The ingredient list or instructions may seem a bit daunting, but everything comes together very quickly. If you're pressed for time you can always throw in a couple slices of avocado instead of making a batch of guacamole.  Just remember to soak your cashews ahead of time for the sour cream!

Raw Tacos
From My New Roots

Walnut Taco Filling:
1 c. raw walnuts
1 T. nama shoyu (raw, unpasteurized soy sauce) or tamari
1/8 t. ground chipotle
1 t. ground cumin
1 t. extra virgin olive oil

Place all ingredients in a food processor and pulse to mix

Cashew Sour Cream:
½ c. raw cashews
1 ½ T. lemon juice
1 t. apple cider vinegar
1/8 t. salt
Water, as needed for blending

Soak cashews in enough water to cover by 3 inches for at least 6 hours, or overnight.  Drain cashews, then place in a blender with the remaining ingredients.  Add 2-3 tablespoons of water and blend, scraping down the sides as needed.  Add water in 1 tablespoon increments until desired consistency is reached. For a thinner sauce, use more water, for a thicker sauce, use less.

Raw Salsa:
1 c. chopped cherry or grape tomatoes
½ red bell pepper, chopped
½ orange or yellow bell pepper, chopped fine
½ red onion, minced
¼ c. chopped cilantro
½ clove garlic, minced
Juice of ½ lime
1 t. raw honey
1 T. extra virgin olive oil
Pinch of sea salt

Whisk the garlic, lime juice, honey, olive oil, and sea salt in the bottom of a bowl and set aside. 
Cut up the vegetables into small pieces, chop the cilantro and add everything to the dressing bowl. Fold to combine and let sit for at least 10 minutes to allow the flavors to meld.


Cabbage (red or green)

To assemble your tacos, gently peel off the outer leaves of cabbage, then carefully remove several inner leaves.
Place a small amount of tacos nut meat in the bottom of your cabbage leaf.  Top with a generous amount of salsa, a spoonful of guacamole and a dollop of sour cream.  Fold up like a taco and eat!  Don't forget the napkins, even raw tacos are a messy affair!